Once upon a time in rendering API’s realm
Here I am presenting what is my experiences when implementing one of the base functionalities in Spelunky-PSP which I currently develop – tile rendering.
Featured in narration, as it makes even that dull essay a little bit joyful.
Back to the basics
Say, you want to draw a single, textured tile in terms of OpenGL pipeline. Having done usual boilerplate, by which I mean creating OpenGL context, loading texture from the filesystem, then uploading to the GPU, obtaining texture ID, binding it to a desired texture slot, writing a dummy shader, compiling, linking vertex and fragment programs, and binding the final product, you finally end up writing the rendering part.
What you need is a frame on which you will stick your texture – so you declare a mesh.
As the tile is a quad, two triangles are pushed to the collection you just created, each of them of three vertices, every described by xy and uv.
Situation is presented by the following image:
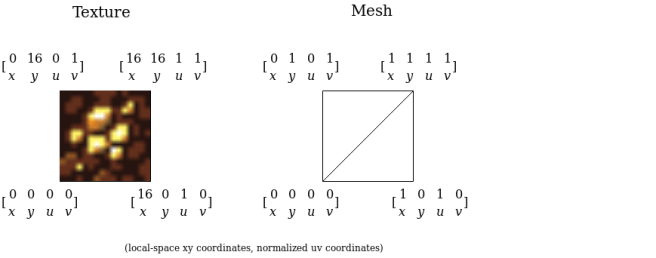
You upload the mesh to the GPU, and eventually issue a render call.
Satisfied with results, you go straight for a full tile renderer.
That means, a draw call for a 2D list of 32×24 tiles will be dispatched every frame (your total map size is much bigger, but I assume that you already thought of some optimization and batch only tiles that are in camera viewport). Most of the tiles differ in terms of attached texture, meaning you will have to issue a lot of OpenGL texture binding calls, but you have heard a lot how premature optimization hurts development, so you dismiss the problem.
After briefly writing your proof of concept, you finally run it on the mobile platform you are targeting. Results are puzzling…
It works, but the FPS counter is below expected 60, and that’s not even a full game yet.
One idea comes – how about sorting the batch of tiles to render by the texture attachment ID? That will surely lessen individual texture binding calls.
Again, you apply performance fix to the renderer, and run a profiler.
This time, rendering the very exact scene takes 14 milliseconds. That’s more that 60 FPS!
But what with rendering other entities? Player, mobs, monsters, items, particles?
Desperate for gaining some time buffer for future additions you want to improve your tile renderer.
Optimizing render call
What needs to be achieved is to minimize quantity of texture binding calls, as each of them is considered time-costly.
Sorting did minimize it, but there’s even more effective method: texture atlases.
If you have all your tiles merged into a single texture, you don’t have to issue any individual texture binding calls ever, except one binding call for the tilesheet.
So you end up sticking two tiles together in the image editor of yours, which can be illustrated by the diagram below:

From this example you see the rule for calculating normalized UV for specific tiles.
Before it can be scaled to rendering more than two tiles, few things must be noted:
- Merging textures together using an image editor is unpleasant and time-costly
- Manual calculating UV’s for each tile is error-prone and time-costly
Imagine storing an animation for a game character in a manually done spritesheet. Suddenly, adding or removing one frame is a massive enterprise, as it involves re-calculating uv’s by hand and cutting the image.
Surely there must be a piece of software that would automatize the process?
Narrator goes off-topic
There’s a lot of free programs that offer such functionality, and as far as my research goes, atlasc is one that has traits I prefer most.
Written in C, it can be built from source (with CMake as a build system), no external dependencies needed, multiplatform, but what’s most important:
- It’s command-line.
- Output image dimensions can be configured. Important on platforms where GPU constraints maximum width/height of uploaded textures, i.e PSP supports up to 512×512 pixels.
- Outputs image metadata in JSON format. Containing individual image name, width, height, x, y (not normalized) and even mesh with complete index buffer.
- Padding and border for each sprite can be configured in terms of pixels.
- Scale of each sprite in output image can be configured
Back on the track
Having all this information, you go and happily merge all your tiles using mentioned atlasc, calling:
atlasc *.png -o level_tiles -B 0 -P 0 -m -W 128 -H 128 -m -2
You modify the game, so it would deserialize outputted JSON in runtime, loading UV’s for each tile, then incorporate them to created mesh.
Your tilesheet looks like this:

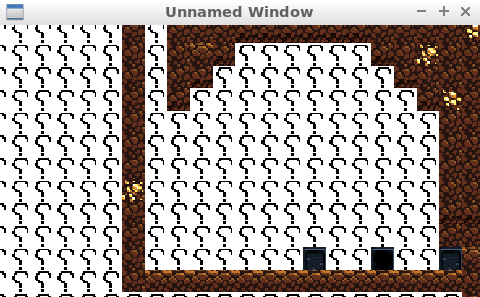
Finally, you compile the program, having so far only one texture binding call in its rendering loop, and run it.
As your heartbeat goes up when you see render call time being even smaller than after sorting tiles, while moving camera you discover some problem:
![]()
Where did those dark seams between tiles come from?!
There is supposed to be no frames between the question-mark tiles.
Here comes the problem
Initially, you search for source of the problem in texture-loading parts of the code, thinking that texture filtering may cause such artifacts.
As your assets are of pixel-art style, you choose nearest-neighbour filtering, instead of linear one, which interpolates between neighbouring texels leading to blurring those sharp, pixel-art edges.


On the left – nearest neighbour filtering, right – linear filtering. Illustration taken from learnopengl.com which I fully recommend.
That gives a hint – as atlasc outputs UV in pixels, and during serialization they are normalized so to pass them to the mesh, probably normalized value goes out of scope of specified tile, bleeding parts of tile that is neighbouring it. Such events are called pixel bleeding.
In case of this question-mark tile, tile that is neighbouring it is a ladder-tile, which would explain bleeding this dark frame (scroll up to the tilesheet and see it!).
As you precisely examine outputted tilesheet in an image editor, it looks like when you’re passing 16×16 tiles, the texture packer cropps them to be 15×15, with UV’s still being of 16×16!
You quickly open an issue on its Github page:
https://github.com/septag/atlasc/issues/2
Apply a 1 pixel correction in the packer sources, recompile it, repack tiles, and…
Resources
More information on filtering:
https://www.khronos.org/opengl/wiki/Sampler_Object#Filtering
Pixel bleeding case, but when using linear filtering:
https://gamedev.stackexchange.com/questions/46963/how-to-avoid-texture-bleeding-in-a-texture-atlas
If I was to write non-pixel-art renderer and utilize linear filtering, and half-pixel-correction would not work, I would fight pixel-bleeding by scaling tiles up on output (feature offered by atlasc), and, when normalizing coordinates, move UV’s by one pixel inwards the tile.
Some very little parts of the image would be lost, but the damage would be minimized by scaling.
