Late in the night I was writing something for SpelunkyDS. Mistakenly, I passed a pointer to printf, that was uninitialised, which definition looked like that:
Obviously, the held_sprite_width had undefined value. It could point to anything, if not set to nullptr. In get_sprite_width, all I called was:
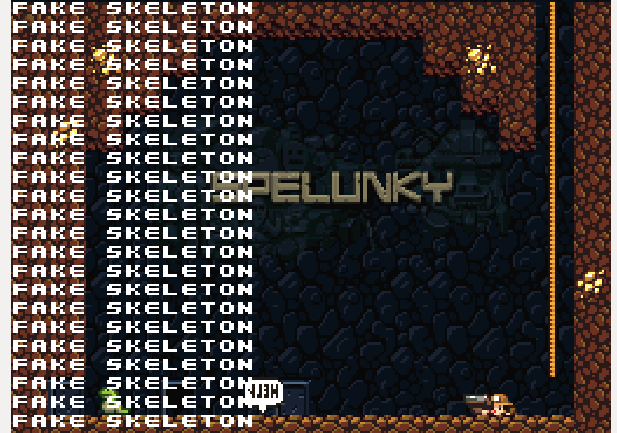
What would it print? No, not just some rubbish, as you would expect.
It printed a “FAKE SKELETON”.
But hang on, why would it print a “FAKE SKELETON” anyway?
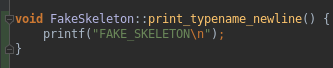
At first, I thought, that the pointer was just pointing to a const char literal that the FakeSkeleton class uses (that class is totally unrelated to the code above, it just happened that the pointer happened to be pointing somewhere in the FakeSkeleton’s memory area). Here’s some code of the FakeSkeleton class:
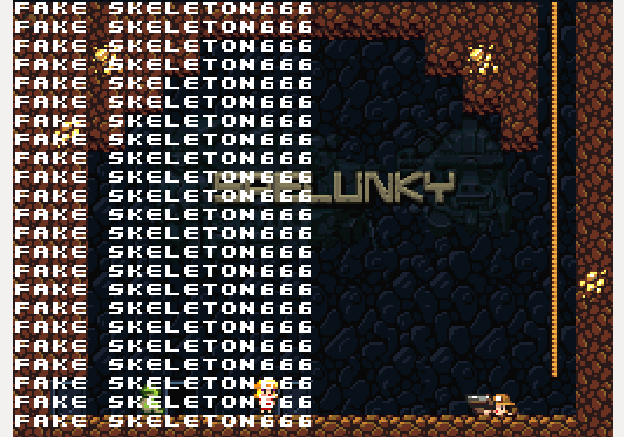
…but after editing the function I was sure that the printf didn’t simply use the literal “FAKE_SKELETON\n”, it called the FakeSkeleton::print_typename_newline as a whole!
http://www.catb.org/esr/structure-packing/
“The clang compiler has a -Wpadded option that causes it to generate messages about alignment holes and padding. Some versions also have an undocumented -fdump-record-layouts option that yields more information.“
Dynamic & Static inheritance in terms of performance:
http://www.thinkbottomup.com.au/site/blog/C%20%20_Mixins_-_Reuse_through_inheritance_is_good Another problem with this approach is the use of virtual functions. We have virtual functions calling virtual functions when we are trying to something relatively simple! It should be noted that the compiler can not generally inline virtual functions and there is some overhead in calling a virtual function compared to calling a non-virtual function. This runtime hit seems unreasonable, but how can we overcome it?
If you’ve never heard of the H&H, here’s a snippet from their page:
Haven & Hearth is a MMORPG (Massive Multiplayer Online Roleplaying Game) set in a fictional world loosely inspired by Slavic and Germanic myth and legend. The game sets itself apart from other games in the genre in its aim to provide players with an interactive, affectable and mutable game world, which can be permanently and fundamentally changed and affected through actions undertaken by the players. Our fundamental goal with Haven & Hearth is to create a game in which player choices have permanent and/or lasting effects and, thus, providing said players with a meaningful and fun gaming experience.
But what’s special in my opinion is:
it’s developed by a team of two Swedes
it’s developed in Java using JOGL
client’s code is open and the game itself is free, which means there are many alternative clients today.
Following by the link to their official git repository and notes from developers.
However, the source I will be dealing with will come from the ‘Amber’ client:
It provides some additional functionalities and is regularly updated:
Downloading and building from sources
>> git clone https://github.com/romovs/amber.git
>> cd amber-1.68.0
>> ant
At this moment some weird errors may occure, but if so, just type ant once more and it should build it successfully. Now, to run, type:
>> cd build/
>> java -jar hafen.jar -U http://game.havenandhearth.com/hres/ game.havenandhearth.com
You’ll end up with a menu screen. However, (at least) to me it wasn’t over, because after logging in an error popped op:
I got to the file on the top of the stacktrace (Buff.java), found the line, had a guess what’s wrong and corrected the thing from this:
To this:
Then build the whole thing once again with ant and I finally managed to log in.
My brief modifications
Camera zoom
So I proceeded through the code for some time after that. I’ve been thinking what would be easy to do and came with an idea of simply enabling maximum camera zoom for a starter. It proved to be easy.
Cameras are managed in the MapView.java,
there’s a chfield function there, which I modified in the following way:
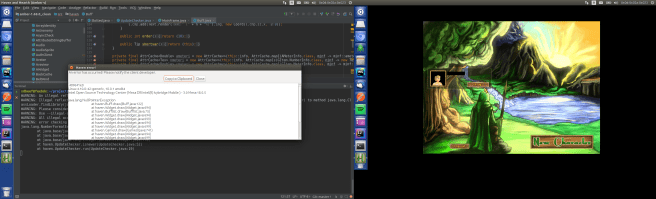
Btw, these comments are mine. I hardly ever stumbled on an existing comment, but if so, they’re mostly some rants/hacks over Java. Anyways, I rebuilt the project and got the camera scrolled up to the orbit with arrow buttons – it worked. I could see the whole area of the map around the player:
Detaching camera from the player
The following idea was:
Space bar would toggle detaching
If detached, one could move the camera to the point on the map, by simply click on some place at the map, but the player still wouldn’t move there
Space bar pressed once again would attach camera to the player and focus on it
As I said, cameras are managed in the MapView.java.
There’s a function that returns object which defines the player:
And a function, that basing on that, returns player’s current coordinates:
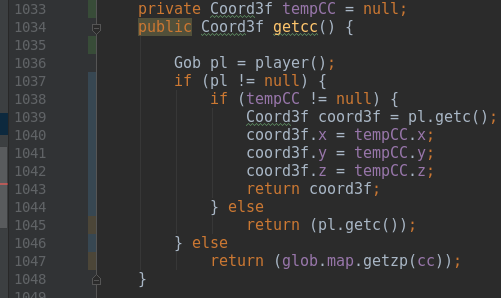
…which I guessed, is used also by the camera, so I created an object that cached player’s position and updated it when:
detached mode is on
left click on map occurs
So getcc looks like this now:
I injected some of my code into the existing function that handles clicking, that is ‘hit’ function. Parts of it, before editing, looks like this:And after adding my code, it starts with:To toggle detaching mode, I edited the ‘keydown’ function, which starts with:I just added an additional branch to the if-else tree:
That’s all. I rebuilt it and recorded my modifications that you could watch it:
Summary
Next time we will tackle the networking code (which fun parts I already found, reside in the Session.java).
Recently I was thinking what would be a good idea to enforce learning fast
hex<->decimal calculation in my head. Obviously, I thought about reading current time in hex, but there is no checkbox for that in the vanilla ubuntu indicator-datetime service (silly Canonical, not including hex time option).
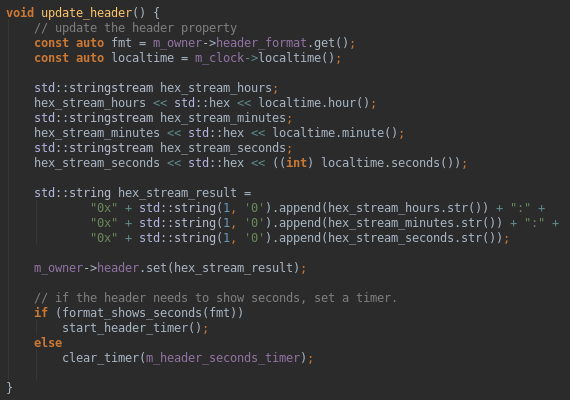
Why not compile a version, that supports that, though? Here’s my modified version:
Hex hour to decimal: 09:05:14
And here’s how I did this:
I Download sources
My Ubuntu is 16.04 LTS, which is important because there are different sources for each major version. Anyway, I found sources here:
My computer lacked certain packages, as I recognized when reading cmake’s log.
What I did in this case was googling “ubuntu package <package name>”, which moved me to the packages.ubuntu, i.e for libecall I found this package:
So I recently stumbled upon a problem provoked by a random craving of launching a VPN-LAN party with my friends. The game we chose is called Minecraft, and it suggests, that one can easily host a game by launching a singleplayer game and then clicking the “Open to LAN” button. Thing is, it doesn’t work that well on VPN’s.
We chose to connect by a Hamachi network, I was the one who hosted the server. I did it by the means I described in the last paragraph, and – to my sheer surprise – no one could connect, everyone was being kicked from the server with a mysterious prompt of:
Failed to log in: The authentication servers are currently down for maintenance.
That’s weird, isn’t it? But anyway, my idea was – let’s just launch Minecraft with access only to the VPN network, not to the internet itself – maybe there will be no authentication attempts if it detects no Internet?
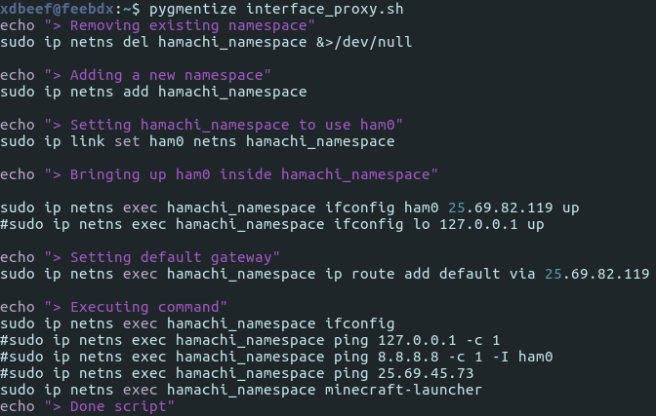
I proceeded to the scripting. Scripting, because on a Linux, one can run a process in a namespace, where it’s going to be sandboxed only to those network interfaces one selects.
Let’s list my interfaces then:
As you see, there’s a ham0 VPN interface that pops out after installing Hamachi, and wlp3s0 which provides me the Internet via WIFI. Now, as we know this, we need to run a minecraft-launcher in a namespace with ham0 only:
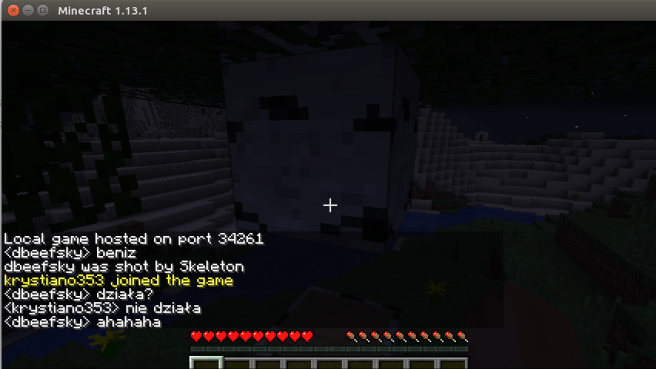
It does what it suggests in the echo’s. After running it I exclaimed SUCCESS!
Minecraft successfuly ran in the offline mode:
That’s great, but now it’s the worst part – my friends use Windows and I had no idea of scripting the same thing on it. I had luck, though – after googling I found out that someone wrote a small program that does exactly what my script did, but on Windows – it’s called ForceBindIP, and as it suggests, it binds a specific network interface / port to the process:
Where the first part is the place where ForceBindIP is installed, the second part is Hamachi IP and the third part is the Minecraft Launcher installation directory.
That’s the moment when we tried again to play. I hosted the game with a launcher I started with my script, my friend tried to connect via ForceBindIP and….
It worked!
And yes, I know that one can download only a *server* and it’s probably going to work – but if that so, why the Open to lan button anyway?
O tym że ten przekład był robiony z głową świadczy to, że sam piszę własne homebrew – moje SpelunkyDS są już całkiem rozbudowaną grą i wiem co tłumaczę. Prawdopodobnie wiem co tłumaczę
Mój jedyny komentarz do tego przekładu – początkowe rozdziały, w których mowa o pierwszych kartach do wrzucania homebrew na NDS można pominąć – wspomniane tam narzędzia to już starocie i w tym momencie zdaje się że jedyną wartą uwagi kartą jest R4. Od rozdziału 4 zaczyna się pisanie kodu.
Create new 32 px / 32px image, paste there your icon (you may need to rescale it with Tools->Transform tools -> scale) or draw whatever you want. You may want to open a toolbox with Ctrl + B.
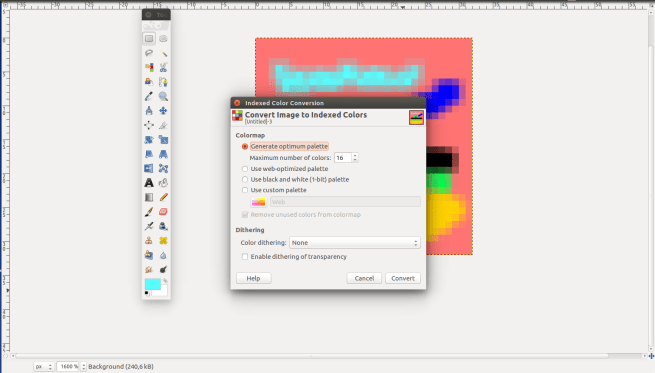
Set image to use indexed pallette with maximum of 16 colors
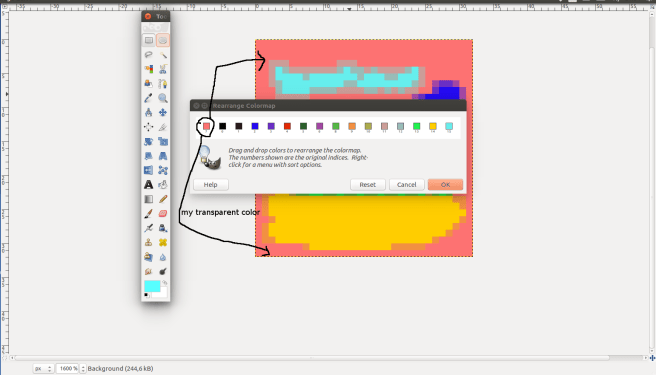
first colour of bitmap would be transparent when rendered on NDS menu, so set it as first in “colors->map->rearrange map”
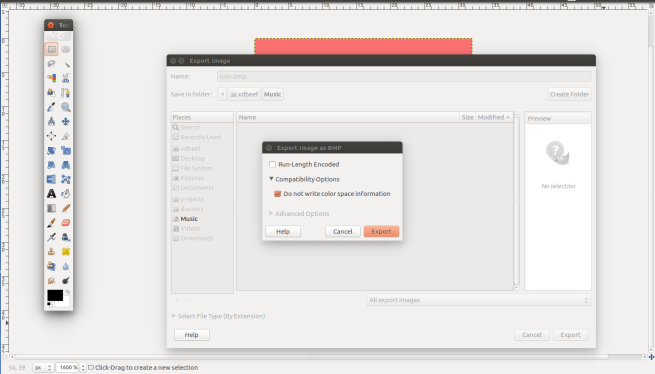
Save in .bmp format BUT you MUST check the “compatibility options” -> “do not write color space information”
In your projects’ Makefile fill GAME_ICON property with path to your icon
Build your nds project, put it on R4 or something else and enjoy
detailed:
Srsly
File -> New, then in window which appears set width / height. No need to change anything in “Advanced options”.
Drawing something ugly:
3. Image -> Mode -> Indexed. Set max colours to 16. Again, no need to change anything else.
4. As I said, choose whatever color that would be unique (you don’t use it in your icon to draw something) – it will stand for the transparence layer. I have arbitrarily choosen this red-pinkish color. Now you have to arrange it to be the first color in the icon palette.
Do this by Colors -> Map -> Rearrange colors map.
Just drag and drop your color to the first place:
5. Ctrl + E, name it as something.bmp, click Export,
Click Export again.
6.
That’s it, finished, you can now build your .nds file with custom icon.
I had to remove music from the .nds binaries, you see, the binary as it is, with only sprites packed into it, is ~600kB. With simple sounds like one for the whip or jumping ~1.2MB. Things get hard when music comes in, it is over ~3.3MB with main menu / title song which causes crashing moonshell and prompting an “too large binary file” error.
You would suggest compressing the .wav more, but the compression is already in its really limits, when it comes to decent sound quality.
I wrote a prototype of SpelunkyDS using nitrofs – it streams music from the R4 card, not from the binary itself. Works good enough in desmume, but when copying to the card and trying in moonshell, it can’t find a filesystem. Problem is, to use nitrofs is to use a specific firmware, which is nds-hb-menu.
It would render SpelunkyDS only usable on cards prepared explicitly for homebrew – sad, but that’s the cost of using so fatty assets like music.
But for now – I’ll just focus on coding another things and leave the music for some time, perhaps there’s a better solution.
Also, as I have recently seen, there’s not so many tutorials on homebrew things like putting an icon to NDS file or aforementioned streaming music from filesystem (with nitrofs).
Na tym etapie, program w końcu zaczyna przypominać oryginalne Spelunky, zebrałem więc krótkie podsumowanie.
Co większą zmianę kręciłem krótko hmm gameplay? Dlatego postępy krok po kroku można po prostu obejrzeć:
Co zostało?
AI, zbieralne przedmioty, wspinanie się na drabinach/linach, druga warstwa tła (nałożona na mapę kafelkową i sprajty), menu, zastanowienie się na tym, czy zostawić mapę współdzieloną między ekranami.
Po skompilowaniu, Spelunky włączam na nds poprzez kartę R4 , ale jeśli faktycznie uda mi się je dokończyć, to spróbuję znaleźć sposób na (bardzo amatorskie) wyprodukowanie kilku kartridży samemu. Dla przykładu, schematy budowy Game Boy Advance są w internecie:
Jeśli chodzi o trudności jakie napotkałem podczas reprodukowania gry to były ogromne na początku, później (chyba) takie same jak przy każdej innej grze, bez różnicy czy na konsolę.
Najgorszym problemem było rozwiązanie adresowania pamięci, libnds wystawia odpowiednie funkcje do zarządzania VRAM-bankami, ale adres poszczególnego sprajta (np. ikony liny na górze ekranu) zależy od głębi kolorów (ja używam 4 bitowej, 16 kolorów) i wielkości (libnds dzieli podane mu obrazki na kafelki wielkości 8×8, więc zależy od ilości takich kafelków).
Zaadresować należy też oddzielnie palety kolorów, czcionkę i kafelki tła (mają swoje oddzielne banki).
Nie brzmi to tak srogo, ale jeśli chociażby załaduje się grafikę o innej głębi niż podano w kodzie, to całe adresowanie jest niepoprawne i pojawiają się artefakty takie jak ten:
Konsola obsłuży max 128 sprajtów per ekran (ograniczenia ze względu na ilość pamięci), nie wiem jeszcze jak łatwo będzie zająć 100% CPU (chociażby sprawdzaniem kolizji między wszystkimi obiektami), ale patrząc na to, że ta konsolka z 2004 roku potrafi coś takiego:


 To this:


 And after adding my code, it starts with:
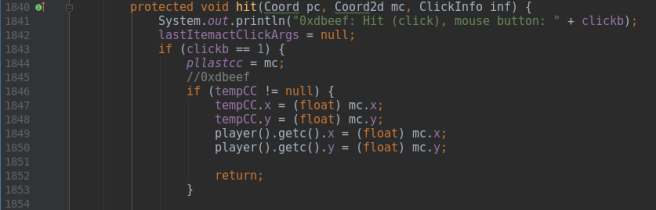 To toggle detaching mode, I edited the ‘keydown’ function, which starts with:
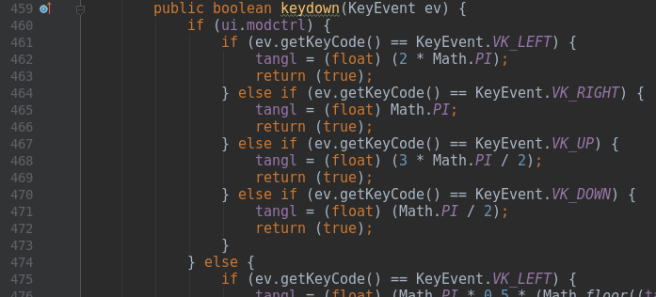 I just added an additional branch to the if-else tree:


 Failed to log in: The authentication servers are currently down for maintenance.
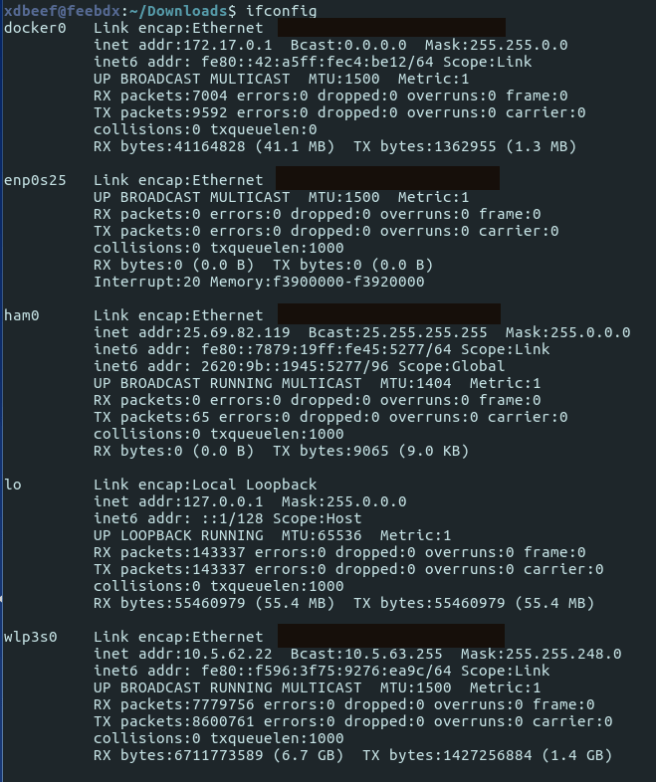


You must be logged in to post a comment.